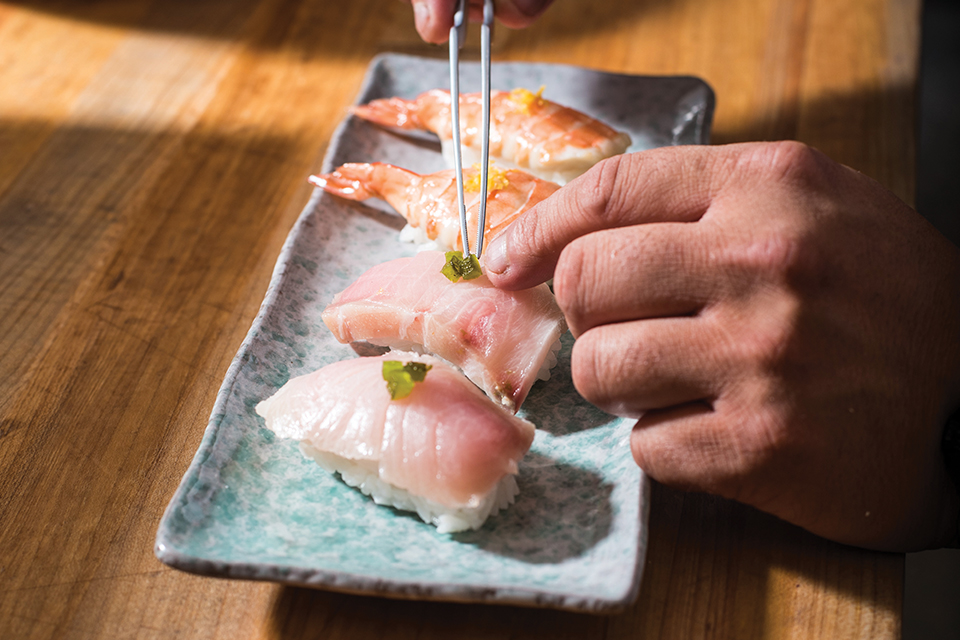
Sushi Made Simple

Ingredients
4 cups sushi rice
¼ cup sushi zu–sushi rice vinegar (can be purchased at any Asian grocery store)
1pk nori sheets, cut in half
As needed, cucumber “sticks” deseeded and cut into ¼” x ¼” x 4 ½”
As needed carrots julienne cut approx. 4 ½” long
2 each jalapeño, roasted, peeled, deseeded, julienne cut lengthwise
1 each avocado, quartered, and then sliced equally, lengthwise, into 5-6 slices, about ¼” thick
As needed, asparagus cut to 5 inches in length, blanched in salted water and shocked in ice water.
As needed, fish fillet–sushi grade fish (tuna, red snapper, salmon, amberjack, or ocean trout)
As needed, extra large shrimp, shell on, tail on.
As needed, 6” skewers, one for every piece of shrimp
As needed, wasabi
Tools Needed
1 makisu—bamboo sushi rolling mat.

Methods
For the Rice
1. Follow the instructions provided, however most common ratio is 1 cup of uncooked rice to 2 cups of water. Make sure to rinse as much of the starch off as possible as this will cause the rice to be “sticky” once cooked. Ideally, you’ll rinse the rice 4-5 times in a strainer or colander. You’ll know it’s done when you place the rice back into water, and the water remains clear. This is probably the most important step when it comes to making sushi; the two key things are:
– quality of the rice and how it’s cooked and seasoned
– quality of the seafood used.
2. When the rice is finished cooking transfer from pot/rice cooker to a larger, flat vessel. A normal size cake pan will do depending on how much rice you are cooking.
3. While rice is hot, slowly mix in the sushi zu and with a rice paddle or spatula, gently fold in the sushi zu. You will see that it’s really “loose” at first, but the rice will absorb it and after a few minutes it will come together. Taste the rice and if needed add more sushi zu.
4. Cover with foil and set aside to stay warm.

For the Shrimp
1. Run a single skewer in between the belly of the shrimp and the shell from the “head” side to the center of the tail. The goal is to keep the shrimp tail straight so that when it cooks, it doesn’t curl up.
2. Bring a pot of salted water (should taste as salty as the sea) to a boil. Drop in skewered tails in for 1 minute 25 seconds and immediately remove to an ice bath to stop the cooking process.
3. Repeat. When all shrimp are cooked, remove the skewer, peel off the shells.
4. Run a knife through the belly and cut all the way through the shrimp being careful not to cut through the back meat. Once the “vein” is exposed, peel out vein and set shrimp aside.
Fish for Nigiri
1. Clean up filet and cut into a piece that is approx. 3 inches wide by 1.5 inches thick.
2. Cut the fish at a bias at a 45 degree angle, going against the grain so that the piece is approx. ¼” thick. This will keep the fat of the fish running perpendicular to the piece cut so that it breaks down easier when you chew.
Rice for Nigiri
1. With moist hands, use three fingers to scoop out warm rice and form it into a “football” in your hand. Compress it enough so that it holds it’s shape but no so much that it becomes too dense. The approx. dimensions should be about 1.75”-2” in length and about .75” in diameter.
Nigiri Assembly
1. Once the rice ball is formed, simply lay the topping along the top of the rice and lightly press and squeeze in your hand to ensure they are matched together.
2. This is where the fun is with nigiri. You can then top the fish or shrimp with other condiments of your choosing. Examples are: lemon zest, grated ginger, thinly sliced green onion, a brush of ponzu (which can be purchased at any grocery store). The sky is the limit.
*One key and traditional thing to take note of: When eating Nigiri sushi, it is suggested to place the nigiri into your mouth with the fish side touching your tongue. This way you taste the true flavors of the fish, and as you chew it blends and compliments the slightly tangy seasoned rice.

Maki Rolls
1. Flatten out your makisu and cover with plastic wrap (about three wraps). Lay flat and press out any air pockets that may have formed.
2. Cut your full size nori sheets in half.
3. Take your fish fillet, and cut out batons the same dimensions as the cucumbers.
4. Lay a single half sheet of nori on your plastic wrapped makisu. Spread a thin layer of sushi rice across the entire piece of nori.
5. In the center—being careful not to add too much of the ingredients—lay a single row of fish, cucumber, and jalapeno from end to end.
6. Using the makisu, lift up and begin to roll the sushi, using your fingertips to tuck in the ingredients as the roll curls over it. The bottom edge closest to you should just cover the center ingredients as the top edge furthest from you seals the roll shut.
7. Cut the maki roll in half. Proceed to then cut those in half and then in half again until you have 8 equal sized portions.
8. Repeat steps 3-7 using your veggie ingredients (asparagus, avocado, carrot). Again this is where you can let your imagination run wild. With properly seasoned rice, the rest is up to you—get creative! As long as your ingredients are cut to similar sizes that I’ve suggested, you can create just about any kind of maki roll you desire. Go for the traditional California rolls (imitation crab meat, cucumber, and avocado) or try something totally new.


